Voice Conversion with Realtime
Realtime inference is internally much the same as regular inference, but works on a live audio stream instead of a pre-recorded file. This makes it useful for humor or scambaiting. Aside from that key difference, it has many of the features of regular file-based inference.
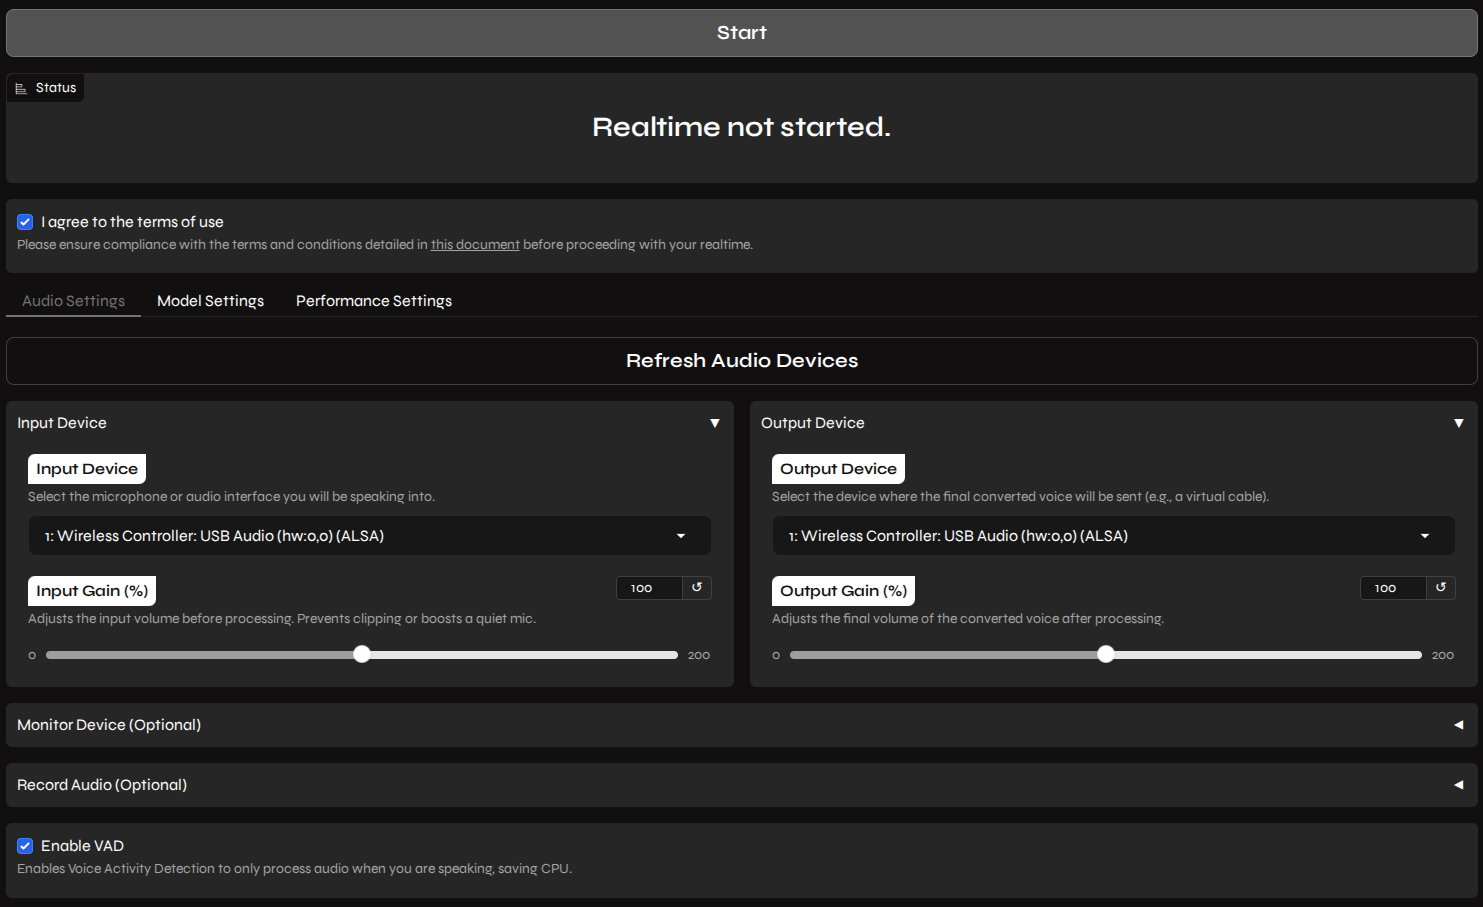
How to Perform Realtime Inference
Section titled “How to Perform Realtime Inference”- Select an Input Device: Click the drop-down device menu in the Input Device panel, and select one.
- Select an Output Device: Same song, second verse, this time in the Output Device panel.
- Switch to the Model Settings tab.
- Select Your Model: Choose the
.pthand.indexfiles for your model. If you don’t see your model in the list, click the refresh button. - Start the engine: Click the large Start button at the top of the page. It may take a moment to load, but you should soon see some fluctuating Latency readings. Keep an eye on the console for errors.
- Shutting down: When you are done, click the same button again, now labeled Stop, to stop the realtime engine.
Additional settings
Section titled “Additional settings”Audio settings
Section titled “Audio settings”- Gain: All three audio devices (Input, Output, and Monitor) have a gain slider to adjust their volume:
- Input gain should be adjusted if you encounter distortion from input clipping, or if the model seems to have a hard time hearing you (i.e. it only produces output when you are being very loud).
- Output gain can be adjusted to the requirements of any audio application you might be piping into (e.g. Discord, OBS Studio, etc).
- Monitor gain can be adjusted to your tastes.
- Monitor Device (Optional): Useful for when you want the converted audio piped into another application, but you also want to hear it.
- Enable the feature: Click the Use Monitor Device checkbox.
- Select a device: Click the Monitor Device drop-down menu, and pick a device that is not the same as the Output Device.
- Continue preparing for engine start.
- Record Audio (Optional): While realtime inference is running, you can start and stop recording the output to a file.
- Choose an output path, if desired: This isn’t really necessary, as you will have a chance to download the file elsewhere, and is also restricted to Applio’s allowed paths, but you can set an Output Path other than the default if you want. The biggest use for this is to correct the output file extension to match the Export Format that you select. It can also be used to prevent Applio from overwriting
assets/audios/output.wav. - Choose an export format: Applio defaults to saving the recorded audio as Microsoft uncompressed Wave PCM, but you can choose to save it as lossy ultra-compressed MPEG-3, compressed Free Lossless Audio Codec, or lossy compressed ultra-seekable OGG. Note: If you choose something other than WAV, you should manually change the file name extension yourself in the Output Path.
- Begin recording: Once the realtime engine is already running, click the big Start button in the Record Audio (Optional) panel to begin recording. Click it again later to Stop.
- Choose an output path, if desired: This isn’t really necessary, as you will have a chance to download the file elsewhere, and is also restricted to Applio’s allowed paths, but you can set an Output Path other than the default if you want. The biggest use for this is to correct the output file extension to match the Export Format that you select. It can also be used to prevent Applio from overwriting
- Enable VAD: This is essentially the VOX setting on a two-way radio, only running inference when Applio detects that you are actually talking. This saves compute power only intermittently, so it won’t help for gaming on the same machine, but it might help improve battery life or thermals, as well as reduce artifacting from inferring near-silence. You can control the threshold for this in Performance Settings.
Model Settings
Section titled “Model Settings”All of these settings are functionally the same as their counterparts in file-based inference.
Performance settings
Section titled “Performance settings”- Chunk Size (ms): Control how far behind the present Applio’s conversion should be. Setting this high will increase latency, but setting it too low will result in higher GPU usage or artifacting.
- Crossfade Overlap Size (s): To prevent clicking between the chunks of audio Applio processes, Applio overlaps them with crossfading. Setting this overlap larger will naturally push processing farther into the past (i.e. increase latency), but setting it too low may sound jittery.
- Extra Conversion Size (s): Each chunk of audio can include some already-processed past data to increase context. This can improve conversion quality, but remember, you are passing your GPU audio to infer faster than you are recording it. Setting it too high will mean your GPU cannot keep up.
- Silence Threshold (dB): Remember Enable VAD back in Audio Settings? This is where you can control its threshold. Below this level, Applio treats the input audio as silence and does not infer it.